Boler Reno’s Don’t Come Easy: Axle Replacement Update

A quick update on our axle and frame replacement.

The frame was touched up and the connections to the vehicle have been replaced.

The axle has also been replaced, but not without a few headaches.  As with everything Boler related, nothing seems to go to plan.  There was an issue with placing the order which caused a delay.  Then, it turned out they ordered the wrong axle, which lifted the Boler up by at least 6 inches.  It looked rather odd and it would no longer fit in our garage for winter storage. So, the company had to remove the new axle and replace it with another one which was smaller and allowed the Boler to return to it’s original ride height and fit into our garage for storage.  Thankfully the company was good about it as it was noted our original word order that the new axle must ensure the original ride height was maintained.

Unfortunately, the issues resulted in multiple missed Bolering trips. But, since the axle is clearly important to the functioning of the Boler, all we could do was wait it out.

So, in good news, August long was our first Bolering trip of the season, and I’m happy to report that everything went perfectly!

If you like this post, please feel free to share it and please return to www.ourboleradventures.wordpress.com to follow our adventures.

Boler Axel & Frame

It’s a new year and we have lots of camping planned this year!  Which means, it’s time to get the Boler ready for the season.

We’ve debated a few Boler projects this year:

  • upgrading the ice-box to a real fridge, a nice luxury.  But depending on which fridge option we go with, it could be rather expensive.
  • a heater to extend our camping season.
  • a new axel, because I’m told it’s time for a new one.
  • a new roof vent with a fan.  This one is risky as we currently park the Boler in our garage and only have a few millimeters of clearance, so we don’t want to replace the fan and not be able to park in the garage.

Ultimately, we decided to focus on road safety, and replace the Boler axel.  Now, let me start by saying, I have no idea how to replace a Boler axel (or any axel for that matter), nor does G.  But, we do know that Standen’s knows how to replace a Boler axel, and in fact they have done many Boler axels over the years.  So, this upgrade is being outsources to qualified professionals at Standen’s Calgary.

We took the Boler in last week to have everything measured up, and the replacement is scheduled for next week.  We debated upgrading the axel to include breaks, which would have necessitated upgrading the connections to the 4Runner.  Ultimately we have decided considering how light the Boler is, there really is no need for breaks on the Boler.

But, like all Boler related projects, this has already turned into a larger project.  When Standen’s lifted the trailer to measure for the new axel, three additional projects were added to our list:

  • They discovered two cracks in the frame.  So, those cracks are going to be fixed – which is a good thing, because we really do not want the frame break while driving down the highway!
  • They also informed us that the connection to the vehicle also needs to be re-done to meet modern specifications.  So, that’s also being done.
  • The tire rims are also being replaced because they said it’s time.

Considering the basic safety of these items, we decided just to do it all.  Which of course means our costs are going up, but they really are necessary costs considering how important the frame is.  I’ll try to do another update in a few weeks sharing how everything went when the axel and frame modification are complete.

And, the good news is that in a few weeks our Boler will be road ready and summer camping can begin!

We may do a few more reno’s/upgrades this year, or we may wait until next year. I feel like we may just spend our summer focusing on having fun camping rather then spending our time working the Boler.

If you like this post, please feel free to share it and please return to www.ourboleradventures.wordpress.com to follow our adventures.

Boler Tires – Part 2

Our new tires arrived and have been installed.  It’s sure nice to know that we are now rolling on decent tires without a giant crack running down the centre of one of them!

We really like the original Boler hubcaps so we elected to continue using the old rims, even thought hey are rusted.

The arrival of the new tires means our Boler is now sitting on the ground just as it should be.  And soon enough, we’ll be on the road heading towards the Rocky Mountains.

Up next, the on going battery saga which may or may not be solved before our this years first camping trip.

If you like this post, please feel free to share it and please return to www.ourboleradventures.wordpress.com to follow our adventures.

Boler Tires – Part 1

Every year we start the camping season by doing a once over of the Boler.  We check to make sure we have power (we don’t – more on that once G figures out the problem), we check our tire pressure, we check to make sure all our camping supplies are ready to go, etc.

Clearly, this year we determined that we have a few fixes to take care of before we hit the road and before we tackle the rest of our to-do list.

This is the current state of our Boler:

There’s actually a bit of a storey as to why our Boler currently looks like this.  The other day, my brother was forced to stop in our City for a few hours while they waited for Canadian Tire to fix a tire.  Their trailer (not a Boler) blew a tire.  And in doing so that tire also shredded through their kitchen cupboard, pluming, electrical, etc.  In the end, they have multiple thousands of dollars worth of repairs to do to their trailer.  (I should mention, they bought it second hand just over a week ago.  Needless to say they are not happy).

Anyways, since we got our Boler a few years ago we kept saying we needed to replace the tires as we are pretty sure they are original tires.  And we kept putting it off, simply because we were putting money into other things.  Needless to say, seeing my brother’s family parked in a Canadian Tire Parking lot for hours on a hot summer afternoon, officially motivated us to bite the bullet and replace our tires before we experience their plight.

Taking off the existing tires turned out to be a bit more challenging then expected.  It turns out we we lost the tire wrench for the Boler (or maybe we never had one?).  Both G and I just assumed it was in the Boler, but it turns out it was nowhere to be found.  So, after searching high and low, G improvised.  Given this, we thought it would be wise to buy a new one to store in the Boler just in case we need to use the spare tire and we aren’t parked in our garage.

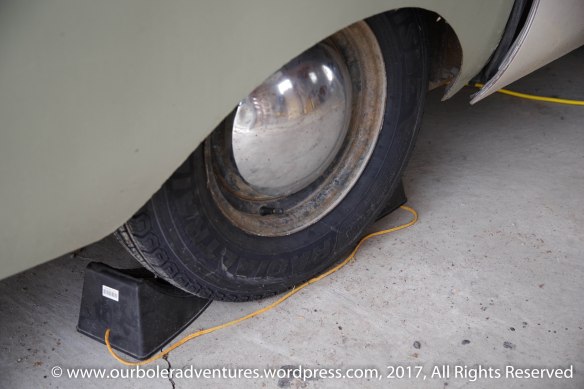
And once we took off the tires, we saw this:

Needless to say, its a VERY good thing we replaced the tires NOW!

While we hope to never have to use the spare tire, we were pretty quick to realize that we’d prefer to have a working spare tire.  So, we are replacing all 3 tires.  $500 later, 3 new tires are on order, and we are hoping they arrive soon so that we can get out camping in the beautiful weather.

If you like this post, please feel free to share it and please return to www.ourboleradventures.wordpress.com to follow our adventures.

Another Summer of Bolering

Last summer I thought I’d be able to work full time, take care of an infant, camp, and maintain our Boler blog.  It turns out, I couldn’t.  Truth be told, I still don’t know how we managed to work full time and fit in two camping trips with an infant last summer!

But, this year, I truly think I can do it!  In large part because our infant is no longer an infant.  A is now 18 months old and everything seems just a little bit easier now that we are out of the infant fog.

After doing absolutely no Boler renovations/improvements last year, I’m optimistic that this year we should have enough energy to do a few things.  In fact, we have a bit of a to-do list that we are currently planning to attack:

  • Hopefully installing a truck box on the front of the Boler.
  • Maybe adding some mud flaps.
  • Hopefully finding a real fridge for the Boler (our current icebox is absolutely useless and was just a complete waste of money).
  • Probably purchasing new tires.

And of course, we have a few camping trips planned.  I suspect A will love camping this summer, as his favourite place to be is outside.

It should be fun!!

If you like this post, please feel free to share it and please return to www.ourboleradventures.wordpress.com to follow our adventures.

Camping with a Baby

To some, probably long time parents, camping with a child has become routine – where to go, what to pack, how to spend your days, these things are all pretty simple.  For us, it’s an entirely new experience, so nothing is routine.  At least not yet.

In a few weeks we are going to venture out for the first time as a family of 3 + 1 dog.  So, it’s time to start getting prepared.  This weekend we intend to pull out the Boler and do a once over – make sure everything is working (i.e. battery is charged, propane tank is full, etc.)  And, we also plan to make sure the basics are still packed away safety where we left it all last fall (i.e. awning, stove, dishes, etc.).  And I’ll probably start packing up some of the other basics that we store in the house through the winter (i.e. blankets, food, campfire clothing, etc.)

But, as I’m thinking about what I need to start packing, I’m already realizing just how much camping is going to change for us.  First off, how the heck do you fit all the baby stuff in the vehicle/Boler?  What stroller should we bring?  For that matter should we even bring a stroller, or should we just rely on our backpack carrier?  What about storing baby food and formula for multiple days?  How many toys are actually needed?  And how does one bath a baby in the woods?  Something tells me that’s going to be a requirement since baby will likely get pretty dirty spending so much time outside.  But, I also suspect it will be a hilarious site for neighbouring campers.

And, what do the adults do when the baby naps?  In the past we’ve become accustomed to spending our camping days on the go – we love to hike and go fishing. But, I don’t think any 20+ kilometer hikes are in our near future.  Nor are full days of fishing.  We can and will still do both of these activities, but in much smaller time allotments).  Needless to say, I think we are going to have to learn to slow down and enjoy the campsite.

Our main goal for the next few years of camping is simply to introduce Baby A to the outdoors and hopefully start laying the foundation for a shared love of nature.  So, with that in mind, I need to prepare the Boler for a laid back baby friendly camping trip.  Hopefully it goes well!

If you like this post, please feel free to share it and please return to www.ourboleradventures.wordpress.com to follow our adventures.

Ops! We Disappeared, But Are Back Now!

During the Canadian winter we don’t have much to say about our Boler, simply because we aren’t using it.  Once the temperature drops off and the snow falls the Boler finds itself tucked nicely into our garage for the winter (it fits in our garage with about 5 mm of clearance).  Once away for the winter, it becomes a storage spot for all thing camping until the spring.

.

Well, it’s spring again!  So, we are looking to take the Boler out for some fun.  But, that also means we need time to do some more work on it.  We have a few small projects we want to complete on it this year – the addition of a tongue chest box on the front of the trailer to hold the battery and a propane tank.  And as an added bonus it will also act as a rock guard.  We bought it last year, so it’s time to attach it.  In addition we’d love to find a new vent for the top of the Boler, this way we can replace the old one that leaks a little bit.  BUT, we want to be able to continue parking the Boler in our garage so it must be a low profile vent cover – this could be hard to find.

But, even more importantly, this summer we have to figure out how to safely use our Boler with our 90lbs dog and our new baby!  Yes, that’s right, we have a little one to join in our camping fun – A.  We are ever cautious about leaving A and dog together, so we aren’t quite sure how to have the four of us sleeping in the Boler.  We are looking for ideas.  Right now we are thinking, dog on the ground in the middle (as per normal).  G on the couch. L and A on the bed.  A will be tucked into the side so that L separates baby and dog.  BUT, we also aren’t co-sleepers.  So, how do we do this while keeping baby safe at night?  We are thinking of buying a Dockatot Grand.  But at nearly $420 it seems a little steep.

Anyways, we do have a few camping trips booked for the summer, so we need to figure it out sooner rather then later!  I’ll be sure to update once we figure out a plan.

 If you like this post, please feel free to share it and please return to www.ourboleradventures.wordpress.com to follow our adventures.

Sleeping Level

We decided it was time to make camping slightly more comfortable, with the simple addition of levels on the outside of the trailer.  So when we arrive at a campsite all we have to do is use the levels when we set up.

The two self-adhesive levels cost us about $10, and took about 20 minutes of our time.

We put the Boler on jacks in our garage, and used two levels on the floor.  One going each direction.  Once both levels indicated that we were level, we stuck the trailer levels on the Boler.

We put one on the back of the Boler centered in the middle underneath the window.  We put the other one beside the door.

20140804 - Sleeping Level_IMGP6336We decided not to screw them as to not add more holes to the Boler.  If at some point they fall off, we’ll add screws.  But, so far they have stuck on really well through rain, sun, wind and road travel.

 If you like this post, please feel free to share it and please return to www.ourboleradventures.wordpress.com to follow our adventures.

Epic Fail

After finishing up the cabinet door upgrade (see the posts here and here), we took the Boler out for a weekend of fun.

Of course, we headed the mountains.  And in order to get to the mountains we had to drive over standard city roads and some highways.  Nothing extreme, or so we thought.

About 3 hours later we arrived at our destination.  And we discovered that multiple doors did not stay shut for the maiden voyage and the closet door did not survive.  I forgot to take photos of the complete disaster that awaited us when we opened the Boler door upon arrival, but from the photo I did take you can see that the closet door trip is mostly still hanging and the inside of the door is resting on the floor.  You will notice the closet is nearly empty because everything was relocated to the floor during travel.

Ops.

If you like this post, please feel free to share it and please return to www.ourboleradventures.wordpress.com to follow our adventures.

The Cabinet Door Reveal

As I mentioned the other day, we spent a lot of time this summer making new cabinet doors for our Boler.

Our neighbour offered to help us with finishing up the doors, as he’s skilled in cabinetry making.  So, a few days after we gave him all the pieces, they came back fully assembled and absolutely beautiful!

20150723 - A Significant15We were so excited to get to work that we skipped our evening run and spent night in the garage prepping and painting the doors.

First, we sanded.  And then we sanded some more.

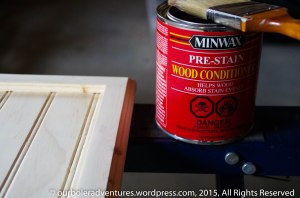
Then we used a pre-stain wood condition.  (I have no idea why this step is necessary, but the friendly people at Home Depot said to do it and for the minimal extra cost and time we did).

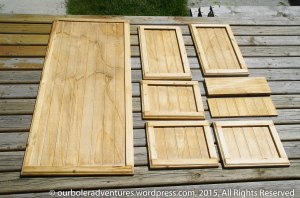
20150724 - The Cabinet Door Reveal_IMGP5854After lots of thought we decided to use a simple wood stain.

And once again I laid out everything on the deck to admire the final product before we installed them.

20150724 - The Cabinet Door Reveal_IMGP6314The latches were a bit of a pain in the butt as we used a different style then previous. We changed the style in part because it was hard to find pieces similar to the original ones, and the trim didn’t lend itself easy to the old style. We ultimately chose to use a style common in modern day trailers, which meant we had to figure out how to make it work with our old fiberglass Boler. We eventually got it, and now the doors lock securely when closed. Hopefully they also stay secure while we are driving!

It was the first, and hopefully last time we will build cupboard doors, and we think they turned out rather well. And honestly, it has completely changed the look of the inside of the Boler.

 If you like this post, please feel free to share it and please return to www.ourboleradventures.wordpress.com to follow our adventures.